Transducers, gauges, sensors - Information portal © 2011 - 2025 Use of material is possible by placing an active link


Attestation, calibration, check of strain gauges
For attestation, calibrating (determinations of calibration descriptions) of strain gauges use standard resilient elements (beams). A beam, as a rule, has sizes (form) which provide equal resistance to the bend (fig. 1) or has a permanent section (fig. 2). A beam has an area (scratch area, on a picture shaded) which deformation is practically permanent within the limits of.
The size of deformation of surface of beam of equal resistance is determined on a formula:
đóńńęčé / english
Home >> Load cells, strain gauges >> Attestation, calibration, check of strain gauges
• Information about various converters and sensors of physical quantities, parameters of various physical processes is presented.
• Electrophysical properties and effects in various electrical materials.
• Theory, experimental results, practical application
Where: Đ is a size of force of ladening (load), Í,
L is distance from the line of fastening of beam to the point of appendix of force,
Ĺ is the module of resiliency of material of beam,
In is a width of beam in the place of fastening,
h is a thickness of beam,
Δh is distance from the surface of beam to the middle of thickness of strain gauges
The size of deformation of surface of beam of permanent section is expected through bending of f on a formula:
Where:
h is a thickness of beam,
Δh is distance from the surface of beam to the middle of thickness of strain gauges,
l is a base of device by means of which determine bending,
f is a sagitta on a base l
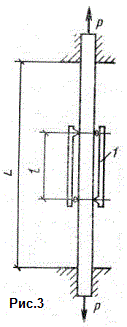
For calibrating can be used and beams working on tension (fig. 3). In this case use the direct measuring of size of deformation in a scratch area. The lack of this method consists of complication of creation of stable axial ladening.
On a picture: 1 is a device for measuring of actual deformation

See also:
CONVERTERS, GAUGES, SENSORS
Information, news, advertising


